Thursday, December 10, 2009

Roy's Guitar, Truss Rod Cover

I wanted to use Roy's actual signature but not being able to find a product called "gold write" I had to try something else. Gold Write, a product no longer made, was a small piece of paper with one side coated in gold. It allowed one to sign and transfer his/her signature onto a medium. But I have used something with results which will turn out great.
The steps: a. choose a font which could I route with a very find routing bit.
b. printed out R. Ponce and glued it to a piece of rosewood
c. routed the letters away leaving an imprint in the wood
d. filled the imprint with silver dust, which I filed off a silver letter removed from an old belt (bought at Goodwill)
e. dropped super glue over the letters (picture)

Next step will be to sand off the glue and shape the truss rod cover.


Friday, December 4, 2009

The Rufus, Neck Shaping

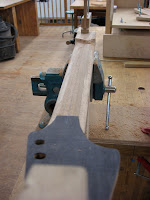
Using a rasp the once square neck has now become rounded. More to come.


Friday, October 30, 2009

Film: Roy's Guitar, Buffage

Making an executive decision I decided to go ahead and put Roy's guitar body on the buffing wheel. I felt that the finish was thick enough to go for it. This short film shows the process.

Thursday, October 29, 2009

Logoing The Rufus

After sanding away the dried epoxy you are left with a pearl logo that looks like it was a natural part of the wood. The small air bubbles will be filed with super glue and sanded flush.

Film: Logoing the Rufus


This short film shows the process I use when inlaying pearl or abalone into an ebony medium.

Roy's Guitar, Chapter 20, Lacquer Finish


The process for a color nitrocellulose lacquer finish is enough to test anyone's patience. All I can say it takes many coats, weeks for drying and much sanding. In the photo you can see the finish is building up nicely. The next step will be to sand flat using 400, 600 and 800 grit paper. Then a final coat will go on and the instrument will sit for three weeks. Then the buffing process will begin.

Thursday, September 17, 2009

Red Rocks Community College's 40th Anniversary Gig

Some fellow instructors and I preformed at the 40th Anniversary celebration of Red Rocks Community College. It is at this school where I assist the Electric Guitar building program. We decided it would be fun to promote the program by playing on our own instruments. The set list: Brown Eyed Girl, Let It Shine, Any Major Dude and Ain't Misbehavin'.


Saturday, September 12, 2009

Roy's Guitar, Chapter 20, Lacquer Finish

Today I added some color tones to the neck and body of the guitar. Sometimes you get lucky, by combining two color dyes and mixing them with the lacquer I was able to produce a nice reddish brown. This blends the maple neck with the mahogany body.


Friday, September 11, 2009

The Rufus, Carving the Recurve

Traditionally the recurved is carved into an arched instrument (violin, cello, etc,) and it gives the top or back plate the ability to vibrate creating a rich sound. In this case it will mainly be an aesthetic addition. A scraper is used to remove wood leaving behind a small concave ring around the body's edges. The light helps see the progress.


Saturday, August 29, 2009

Roy's Guitar, Chapter 22, Lacquer Finish

Sorry it has been a while, but summer is always a busy time. I have finally got around to applying some lacquer to the body. This is a long process which requires many coats and much fine sanding in between. The photos are of the guitar hanging in a spray booth. You can see the true nature of the walnut top as it is brought to life by the lacquer. This is the first coat, there will be many more to come.


Saturday, June 27, 2009

Recording

Sometimes you need to use your feet when recording (picture). Jerry Lewis style. At the keys doing the sounds for the Film, Fret Work. The guitar part once again was recorded with a Marshwood instrument. It is a more subtle part using an EBow (comes in at about 25 seconds) to give it that synthesizer sound. It is a small device held over the strings near the pickups, it sends a vibration through the strings. You can build tension with this thing. You don't pluck!

Friday, June 26, 2009

Film: Roy's Guitar, Chapter 21, Fret Work

Fretwork. All of the preparations are ready; clean radius, straight fretboard and sanded to 000 steel wool. The frets are bent with a crude radius jig which takes the once straight wire and bends it to a circle. Then the fretwire is cut to the appropriate length and set aside. The short film will show you the rest. The guitar part is played using an Ebow. It sounds like a synth.

If you have headphones put em' on.

Film: Fret Work

Fretwork. All of the preparations are ready; clean radius, straight fretboard and sanded to 000 steel wool. The frets are bent with a crude radius jig which takes the once straight wire and bends it to a circle. Then the fretwire is cut to the appropriate length and set aside. The short film will show you the rest. The guitar part is played using an Ebow. It sounds like a synth.

Saturday, June 20, 2009

Roy's Guitar, Chapter 20, Fretboard Radius

Shaping the neck is completed. While working on the neck I decided to remove the walnut veneer on the back of the headstock. This has a cleaner look to it (picture). With the neck shaped and sanded it was time to radius the fretboard. This means taking the existing flat surface of the rosewood fretboard and giving it an arch. This can be nerve racking, because of the choice of inlay (the blocks). A radius is a circle measured in inches, fretboards can have a 7.25-20 inch radius. So if I used a tight radius like 7.25, I might sand away the edges of the block inlay, so I chose a 12 inch radius (the choice of many professionals) and all went well. Using the appropriate radius block, sand paper is adhered to the block and used to sand in the radius. This can take some time. This will be sanded with 80, 100, 150, 220, 320, 400 and 600 grit papers. The key is having a nice straight fretboard the entire length of the neck. This will aid in the installation of the frets, meaning the straighter the job radiusing the fretboard the less work will be needed when dressing the frets.


Friday, June 12, 2009

Roy's Guitar, Chapter 19, Shaping the Neck

With the inlay work completed it was time to shape the neck. With the neck clamped down on a holding jig the center line was drawn. This penciled in line will serve as a guide. Since the neck already has the correct taper I want to work to this line. A rough file starts the process, working evenly is the key. Files seem better for this job, some folks use spoke shaves but I find these have a tendency to dig into the wood. Once the files have done their job the neck is left with a series of parallel lines (see Fig 1.) Then it is time to round it over using a sanding block. A round neck feels good to me.


Friday, June 5, 2009

Roy's Guitar, Chapter 18, Inlaying the Neck

These pictures show the process for pearl block inlays being installed in Roy's guitar. Once the placement is found outlines are traced around the pearl in pen. A Dremel Tool and special inlay bit is used to rout the cavities. Chisels clean the corners of the square cavities, as you can see this can take some time. Each piece of block pearl is fitted in this way. Of course the goal is to have a clean fit with minimal fill needed. With each piece fitting nicely they were glued in place. The next step will be to do some touch up fill. Colored dyes will be mixed with super glue to blend the fill work in with the rosewood fretboard.


Monday, May 18, 2009

Roy's Guitar, Chapter 18, Inlaying the Neck

1. With the pearl logo in-hand the placement on the headstock was found and traced. 2. A Dremel tool was used to route a cavity to the appropriate depth. 3. It is not the black oil from X-Files. Epoxy and black dye were mixed together to make a black filling mixture. This will fill the negative spaces of the logo and will set it off visually. 5. America's best beer, possibly the world and or universe, held the headstock at the perfect angle for drying epoxy. 6. Sanded down to 220 grit the Marshwood Logo on Roy's future guitar has come alive. The drops are not tears of joy but super glue. This was used to fill tiny air holes that sometimes develop in epoxy.


Saturday, May 16, 2009

Roy's Guitar, Chapter 18, Inlaying the Neck


The neck is at the pearl inlaying stage. For the headstock on this guitar the Marshwood Logo will be inlayed out of mother-of-pearl. First the logo is re-sized on the computer to the appropriate scale and printed. It is glued onto the two mother-of-pearl pieces which have been also joined together to form a larger piece. Small access holes (for the saw) are drilled into the pearl. Using the saw the parts not wanted are cut out. It is good to set up some kind of vacuum for this task. Once the logo is completely cut out files and sandpaper are used to smooth lines and saw marks. The finished logo. Next we will inlay this into the headstock.. Stay tuned...

Roy's Guitars, Chapter 17


Roy's Guitar body is 90% complete, the tremolo system and control cavity covers have been made, all the accesses (knob, switch, etc) have also been routed or drilled. Some small adjustments still need to be made to the cover plates. Magnets will be installed so that when you look at the back of the guitar one will not see any screws. This should have a cleaner look. The body has been sanded to about 100 grit and will eventually be sanded to 220. After that it will be time to spray lacquer.

Saturday, May 2, 2009

Roy's Guitar, Update


On the player's side of the neck there are small position markers, these have now been installed in Roy's neck (close-up picture). Tortoise shell material (synthetic, not real shell) was chosen and looks right at home with the color-tones we have established. The mother-of-pearl blocks for the position markers on the fretboard are on the way and should arrive next week. Once the blocks are inlayed on the fretboard the neck shaping can begin. The body has been carved and scuff-sanded. The neck has been fitted into the neck pocket.

Monday, April 27, 2009

Marshwood Guitars makes it on the front page!


Thanks to the staff of Golden Transcript for spending a rainy afternoon talking to me about Marshwood Guitars. You can see the article at: http://www.milehighnews.com/Articles-i-2009-04-23-210483.114125_Sixstring_serenade.html

Just a couple corrections: 1.) I actually made my first guitar (an archtop guitar) at a luthiery school in 2000. A two month intensive course. 2.) I don't remember saying the word "worthless" in reference to an instrument with set-up issues, seems too harsh to me, in guitar making there are no mistakes only repairs. 3.) I also wanted to mention that Roy Ponce is a professional guitarist for the band Brainchild. 4.) To put it in prospective my favorite guitar is a 1985 Ibanez Artist AS-200, for those of you who know what that means, it is a good goal to create something better.

Saturday, April 18, 2009

Carving The Rufus


Carving can take time. I wish I could carve at the speed of this film. It is, however, one of the more rewarding tasks in guitar building. Watch those shavings build up! After I was finished rough carving a sander was used to knock it smooth. I will then go back with scrapers to even out problem areas.

Recording with a Marshwood


Here I am at the computer recording the guitar parts for the film, Carving the Rufus.

The Carving Process


For the past couple weeks I have been carving Roy's top and both sides of The Rufus. Using the Wagner Safety Plane on the drill press I roughed carved the top leaving what looks like stair stepping (picture). Once completed it is time for the small hand planes. The carving process can take some time. Especially in the case of Roy's guitar, the figured walnut is very hard.